Showing posts with label thief. Show all posts
Showing posts with label thief. Show all posts
Thursday, March 26, 2015
Making a Joule Thief Circuit with Steven Chiverton Part 2
Continued from the Previous Article


Dude i used to get bad head aches and stuff playing with air core coils so be careful putting higher volts in them..i once put so much in to my coil it cut my radio off 10 feet away and i almost blacked out.. so i killed the power and i was in a state of confusion for like 2 hours after that.. it took a long nap to fix me.
so be careful!!
so be careful!!
Above is the latest radiant energy battery charger joule thief circuit I built from youtube video, the coil I wound 114 turns bifilar wound onto the core I got from jaycar electronics for around $9
and on one of my tests I adjusted the circuits 1k pot till the neon lite up and no heating was felt in the power transistor since ive put it on a heatsink, a thick heatsink but when I used my 12 volts sla battery with just over 10 volts left in it I got over 131 volts out from it, 14 times more output than I did get from the input ill conduct more tests and put them down here , to see what outputs I can get from various inputs .
the 12 volts 7.2 amp hour rechargeable sla battery with just over 10 volts left in it I got over 131 dc volts output from the latest joule thief circiut.
Here are the results for various batteries and voltage inputs
1aa battery 1.5 volts type 1.04 volts left in it I got 7.55 volts output from the joule thief
a23 energizer battery 12 volts type had 9.62 volts left in it and I got an unusual reading of 4.23 volts out a voltage loss
yellow click rechargeable 1.5 volts battery, 1.09 volts left in it I got 1.20 volts out from the radiant energy battery charger joule thief.
Ag13 button cell battery 0.397 volts left in it I got 01.3 millivolts out of it
L1154 button cell 1.304 volts left in it I got 4.50 volts out of it through the joule thief circiut.
Ag10 button cell battery it had 1.16 volts left in it I got 4.3 volts out of it through the joule thief circiut.
357a button cell battery with 1.359 volts left in it I got 5.55 volts out of it from the joule thief circuit.
Latest joule thief circiut test . with the potentiometer turned up I adjusted it till the neon come on and then I adjusted it to the max and the voltage reading was over 145 volts and the neon stayed lite and when I turned it down it still stayed lite like it was getting extra voltage all of a sudden . and the circiut unlike the other dident even make that high to low pitch sound , when I adjusted it fully up and down so I don’t know why . so after I got the neon lite it stayed on when I turned the pot full down and back up again . and no heat was felt in the transistor after the quick test.
With the 1k pot set to highest resistance the voltage output was 132.6 volts and the neon is not lit till I turned the pot resistance down to a level where the voltage has increased to around 137.0 volts, and voltage rises around here again to 145.7 with the neon still lit.
Turning the pot resistance down the neon dims at around 91.0 volts and when turn the pot down more to decrease the resistance of the pot more , the neon gets bright again like its getting more voltage and the circuit then squeals like a camera photflash circuit charging up its high voltage photo flash capacitor.
The voltage was then 96.8 volts and climbing. And by reducing the resistance more circuit appears to squeal more, and the neon is still lit bright even when the voltage is at 93.6 volts.
And when I turn the pot up to increase resistance neon got brighter at 73.9 volts, and the voltage rose to 99.8 volts turning pot up more to increase resistance neon got brighter at 152.8 volts to 153.5 volts and when pot was back at full resistance the voltage was then 159.4 volts then it dropped to 135.5 volts.
Note that when the pot resistance was turned down to the point that the neon comes on neon stayed lite all the time despite getting dim here and there then going bright again during the adjustments and the neon never went out again despite adjusting the pot fully to the end either way during the tests the only way to make the neon go out is to disconnect the battery lead , the test can be started again by turning the pot up full, then connect the battery lead then slowly reduce the pots resistance till the neon lights again .
Ive recharged my sla battery up to 12.48 volts and then I fired up both joule thiefs and found that even with my latest radiant battery charger joule thief im getting less voltage output for more voltage input and before it was more voltage output from less voltage input and since the latest tests the battery has gone from 12.48 to 12.1 volts I used .47 volts so far , this is getting strange and dureing the testing the voltage output did go over 100 volts but dident make it to the higher voltage I got before I topped up the 12 volts slr battery. As for the fluro bulb it only lit up a little bit more but not fully so I need more current or voltage to light it fully
First joule theif battery charging tests . results
Button cell battery ag13 battery brand name sun king this battery had only 00.6 volts left in it , I used my first joule thief battery charger to tests it and after a count of 20 it gained enough power to power one of my small joule thief circuits it now has 1.48 volts in it for charging for 20 seconds .
I tried to charge 2 other button cell batteries but they are to far gone and lose charge fast I decided to try and recharge this tiny watch battery out of one of my watches and its been flat for ages so after 3 seconds of charging , it got hot so I let it cool down and I tested it on a small joule thief circuit and it got enough power in it to light the led so it worked 3 seconds was the fastest charging time for such a small battery now my watch is going again. And I didnt get the details of this battery and measure its charge left and after I charged it for 3 seconds .
The 2 button cells that couldnt be charged I charged them for a count of twenty like the other one but when I turned the potentiometer up towards the full to try get more voltage into it, it reverse charged so I ended up with a negative charge when I measured its voltage but still it kept going down so id say they are to dead or no good at all . it was a good thing I halted the charge time for my tiny watch battery after 3 seconds when it started to get hot otherwise it may of exploded but now its perfect ill note the day I charged it up today monday may 24th 2010 just before 7 o clock in the evening I think lets see how long its lasts for till it runs flat .
Ive seen and saved a youtube video on the a23 12 volts energizer and the man dismantled one and it had no carbon and carbon rods in it but it had 8 unmarked button cell batteries in it. my a23 energizer I tried to charge it up more as it was just over the ten volts in it but I managed to get just over 11 volts into it and the voltage was dropping so something was wrong inside it , so I dismantled it and indeed found 8 button cells inside it one had green corrosion around it and its voltage wasnt steady it appeared to climb slowly and the rest all had over one volts in them and I measure everyone of them and also I was able to power my small joule thief with them and get the 3.3 volts led to light up to they will come in handy to .
Below is a picture of one of my smaller joule thief circuits built from a schematic from the net I designed the printed circuit board for it and notice the modified plastic cloths line peg, I use that to hold button cells for testing and the strip of blue tac at the top is my button cell holder.
Most of the batteries on the strip of blue tac was from inside the small 12 volts a23 energizer battery.
One of my a23 energizer button cells was getting a bit low it had a measured charge of only 1.179 volts left in it. this made the joule thief led dim so I used my larger radiant joule thief battery charger and charged it up till it got hot , then I re measured that battery s voltage and it worked , I successfully charged it up to 1.346 volts and it now works better and the joule thief white 3.3 volts led is brighter now.
Below is my 2 radiant battery charger joule thief circiuts the one on the left without a heatsink is the one I used to seccessfully charge my a23 energizer button cell up with. Which was one of 8 button cells found inside the 12 volts a23 energizer battery.
READ ON
Wednesday, March 25, 2015
Weekend Projects with Bre Pettis Make a Joule Thief
In this week’s Weekend Projects video podcast, Make Magazine’s Bre Pettis and I show you how to make a Joule Thief. The PDF file that goes with the podcast is here (450 kB PDF file).
So whatsa Joule Thief? It’s a little wisp of a circuit that allows you to drive a blue or white LED from a low voltage. Normally, if you want to light up a blue or white LED you need to provide it with 3 – 3.5 V, like from a 3 V lithium coin cell. But a 1.5 V battery like a AA cell simply will not work. But using the Joule Thief, it works like a charm. Not only does it work with a brand new battery, but it works until the battery is nearly dead– down to 0.3 V. That’s well below the point where your other toys will tell you the battery is dead, so it can steal every last joule of energy from the battery (hence the name). To learn how to make one, watch the video, which is available in a variety of formats.
The original site where we learned about the Joule thief shows you how to make a miniature version of this circuit, such that you can fit it in a tiny flashlight. However, in the video we show you how to make it big, large enough (1) to make with clumsy hands and (2) that you can see what we’re doing.
After the jump, some detailed photos of how the coil is wound in case you need more detail than in the video.
It’s a little hard to see through my fingers in the video, so here’s the detailed view of the coil and winding your own.
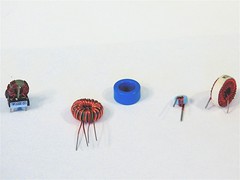
First, here is a selection of ferrite toroids, inductors, and transformers that are suitable for using to make a Joule Thief.
Depending on the type that you start with, you may be able to use the existing wires or need to take them off and wind it yourself.
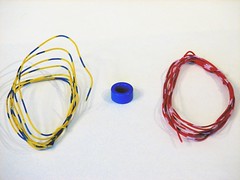
To wind your own coil, start with two colors of insulated wire and a bare ferrite toroid.

Take the two strands of wire through the center of the toroid.
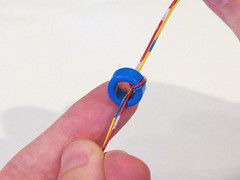
Keeping the two strands together, wrap them around and through the toroid again.
Keeping the two wires together, make a few more turns through the center.

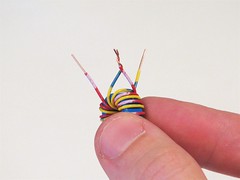
Keep winding until you fit as many turns as will fit in a single layer around the toroid, typically 7-10 turns with thin insulated wire.

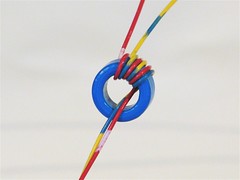
Clip the wire leads down. Note that we have two pairs of wires: one coming out the front, and one coming out the back.
Strip the wire ends. Take one wire from each pair of different color and attach them together.
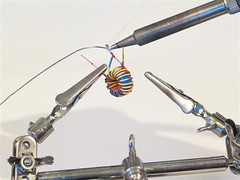
Solder the cross-over pair together. This is the “common” point of the coil windings.
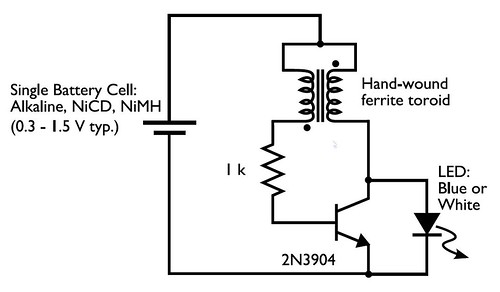
In the circuit diagram for the Joule Thief, the common point of the toroid is the connection at the top of the hand-wound ferrite toroid, in the upper right of the diagram. This goes to the positive end of the battery. The other two wires from the toroid go to the resistor and to the intersection of the transistor with the LED.
One other detail that you may need to know is the symbol and pinout of the 2N3904 transistor. In the symbol, the part with the arrow is the “emitter”, the “collector” is the end above it, that also connects to the LED, and the “base” is the wire leading off to the left, between the collector and emitter. (Also remember that the end of the LED with the flat side and short lead is the end that has the flat bar in the diagram.)
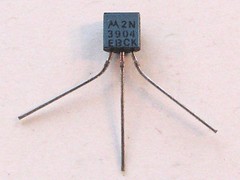
An actual 2N3904 transistor looks like this.
(Well, like this if you’re hungry.)
The pins, holding it so that you can read the text on the flat side are (left to right) Emitter, Base, and Collector. I particularly like this one because it has that little EBC legend on the bottom.
So how does it work?
Pretty well, actually. (The technical discussion has been removed.)
As a side note, this is not the most efficient circuit around; its beauty is that it works with such a low voltage. So, this is a great circuit to use with a dead or dying battery, and less so for use with a brand new battery.
So whatsa Joule Thief? It’s a little wisp of a circuit that allows you to drive a blue or white LED from a low voltage. Normally, if you want to light up a blue or white LED you need to provide it with 3 – 3.5 V, like from a 3 V lithium coin cell. But a 1.5 V battery like a AA cell simply will not work. But using the Joule Thief, it works like a charm. Not only does it work with a brand new battery, but it works until the battery is nearly dead– down to 0.3 V. That’s well below the point where your other toys will tell you the battery is dead, so it can steal every last joule of energy from the battery (hence the name). To learn how to make one, watch the video, which is available in a variety of formats.
The original site where we learned about the Joule thief shows you how to make a miniature version of this circuit, such that you can fit it in a tiny flashlight. However, in the video we show you how to make it big, large enough (1) to make with clumsy hands and (2) that you can see what we’re doing.
After the jump, some detailed photos of how the coil is wound in case you need more detail than in the video.
It’s a little hard to see through my fingers in the video, so here’s the detailed view of the coil and winding your own.
First, here is a selection of ferrite toroids, inductors, and transformers that are suitable for using to make a Joule Thief.
Depending on the type that you start with, you may be able to use the existing wires or need to take them off and wind it yourself.
To wind your own coil, start with two colors of insulated wire and a bare ferrite toroid.
Take the two strands of wire through the center of the toroid.
Keeping the two strands together, wrap them around and through the toroid again.
Keeping the two wires together, make a few more turns through the center.
Keep winding until you fit as many turns as will fit in a single layer around the toroid, typically 7-10 turns with thin insulated wire.
Clip the wire leads down. Note that we have two pairs of wires: one coming out the front, and one coming out the back.
Strip the wire ends. Take one wire from each pair of different color and attach them together.
Solder the cross-over pair together. This is the “common” point of the coil windings.
In the circuit diagram for the Joule Thief, the common point of the toroid is the connection at the top of the hand-wound ferrite toroid, in the upper right of the diagram. This goes to the positive end of the battery. The other two wires from the toroid go to the resistor and to the intersection of the transistor with the LED.
One other detail that you may need to know is the symbol and pinout of the 2N3904 transistor. In the symbol, the part with the arrow is the “emitter”, the “collector” is the end above it, that also connects to the LED, and the “base” is the wire leading off to the left, between the collector and emitter. (Also remember that the end of the LED with the flat side and short lead is the end that has the flat bar in the diagram.)
An actual 2N3904 transistor looks like this.
(Well, like this if you’re hungry.)
The pins, holding it so that you can read the text on the flat side are (left to right) Emitter, Base, and Collector. I particularly like this one because it has that little EBC legend on the bottom.
So how does it work?
Pretty well, actually. (The technical discussion has been removed.)
As a side note, this is not the most efficient circuit around; its beauty is that it works with such a low voltage. So, this is a great circuit to use with a dead or dying battery, and less so for use with a brand new battery.
Subscribe to:
Posts (Atom)